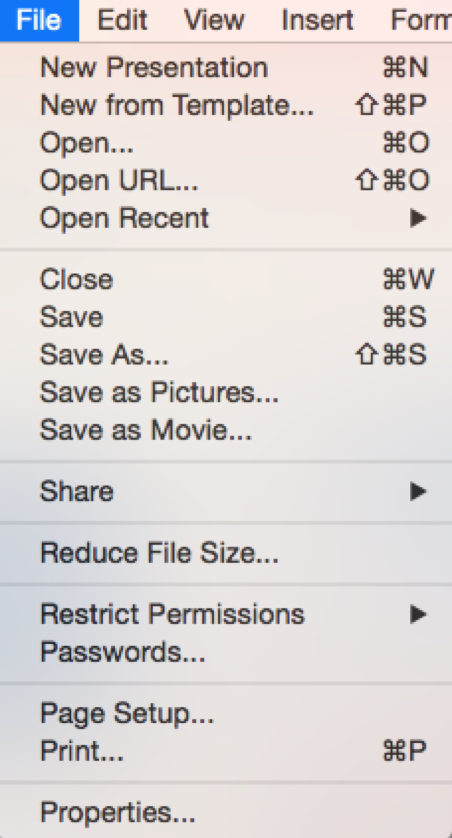
메뉴 (Menus)
메뉴는 UI의 또 다른 표준 구성 요소이다. 일반적으로 창 상단 또는 macOS의 화면 상단에 있다. 모든 표준 응용 프로그램 기능에 대한 액세스를 허용한다. 파일, 편집, 도움말과 같은 몇 가지 표준 메뉴가 있다. 메뉴를 중첩하여 기능의 계층적 트리를 만들 수 있으며 해당 기능에 빠르게 액세스할 수 있도록 종종 키보드 단축키를 지원하고 표시한다.
메뉴를 생성하기 위해 QMainWindow에서 .menuBar()를 호출하는 메뉴바를 생성한다. .addMenu()를 호출하여 메뉴 이름을 전달하여 메뉴 표시줄에 메뉴를 추가한다.
이미 존재하는 QAction을 재사용하여 메뉴에 동일한 기능을 추가할 수 있다. .addAction 액션을 추가하려면 정의된 액션 중 하나를 전달하는 것을 호출한다.
class MainWindow(QMainWindow):
    def __init__(self):
        super().__init__()

        self.setWindowTitle("My App")

        label = QLabel("Hello!")
        label.setAlignment(Qt.AlignCenter)

        self.setCentralWidget(label)

        toolbar = QToolBar("My main toolbar")
        toolbar.setIconSize(QSize(16, 16))
        self.addToolBar(toolbar)

        button_action = QAction(QIcon("bug.png"), "&Your button", self)
        button_action.setStatusTip("This is your button")
        button_action.triggered.connect(self.onMyToolBarButtonClick)
        button_action.setCheckable(True)
        toolbar.addAction(button_action)

        toolbar.addSeparator()

        button_action2 = QAction(QIcon("bug.png"), "Your &button2", self)
        button_action2.setStatusTip("This is your button2")
        button_action2.triggered.connect(self.onMyToolBarButtonClick)
        button_action2.setCheckable(True)
        toolbar.addAction(button_action2)

        toolbar.addWidget(QLabel("Hello"))
        toolbar.addWidget(QCheckBox())

        self.setStatusBar(QStatusBar(self))

        menu = self.menuBar()

        file_menu = menu.addMenu("&File")
        file_menu.addAction(button_action)

    def onMyToolBarButtonClick(self, s):
        print("click", s)
메뉴에서 항목을 클릭하면 토글할 수 있음을 알 수 있다. 이 항목은 QAction의 기능을 상속한다.

메뉴에 몇 가지를 더 추가한다. 여기에서 메뉴에 가로선으로 표시되는 구분 기호를 메뉴에 추가한 다음 QAction을 만든 두 번째 구분 기호를 추가한다.
class MainWindow(QMainWindow):
    def __init__(self):
        super().__init__()

        self.setWindowTitle("My App")

        label = QLabel("Hello!")
        label.setAlignment(Qt.AlignCenter)

        self.setCentralWidget(label)

        toolbar = QToolBar("My main toolbar")
        toolbar.setIconSize(QSize(16, 16))
        self.addToolBar(toolbar)

        button_action = QAction(QIcon("bug.png"), "&Your button", self)
        button_action.setStatusTip("This is your button")
        button_action.triggered.connect(self.onMyToolBarButtonClick)
        button_action.setCheckable(True)
        toolbar.addAction(button_action)

        toolbar.addSeparator()

        button_action2 = QAction(QIcon("bug.png"), "Your &button2", self)
        button_action2.setStatusTip("This is your button2")
        button_action2.triggered.connect(self.onMyToolBarButtonClick)
        button_action2.setCheckable(True)
        toolbar.addAction(button_action2)

        toolbar.addWidget(QLabel("Hello"))
        toolbar.addWidget(QCheckBox())

        self.setStatusBar(QStatusBar(self))

        menu = self.menuBar()

        file_menu = menu.addMenu("&File")
        file_menu.addAction(button_action)
        file_menu.addSeparator()
        file_menu.addAction(button_action2)

    def onMyToolBarButtonClick(self, s):
        print("click", s)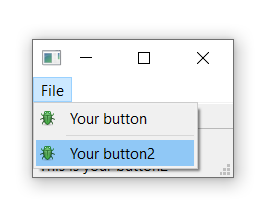
또한 ampersand를 사용 하여 메뉴에 단축키를 추가하여 메뉴 항목이 열려 있을 때 단일 키를 사용하여 메뉴 항목으로 이동할 수 있다. 다시 이것은 macOS에서 작동하지 않는다.
하위 메뉴를 추가하려면 상위 메뉴 addMenu()를 호출하여 새 메뉴를 생성하기만 하면 된다. 그런 다음 평소처럼 작업을 추가할 수 있다.
class MainWindow(QMainWindow):
    def __init__(self):
        super().__init__()

        self.setWindowTitle("My App")

        label = QLabel("Hello!")
        label.setAlignment(Qt.AlignCenter)

        self.setCentralWidget(label)

        toolbar = QToolBar("My main toolbar")
        toolbar.setIconSize(QSize(16, 16))
        self.addToolBar(toolbar)

        button_action = QAction(QIcon("bug.png"), "&Your button", self)
        button_action.setStatusTip("This is your button")
        button_action.triggered.connect(self.onMyToolBarButtonClick)
        button_action.setCheckable(True)
        toolbar.addAction(button_action)

        toolbar.addSeparator()

        button_action2 = QAction(QIcon("bug.png"), "Your &button2", self)
        button_action2.setStatusTip("This is your button2")
        button_action2.triggered.connect(self.onMyToolBarButtonClick)
        button_action2.setCheckable(True)
        toolbar.addAction(button_action2)

        toolbar.addWidget(QLabel("Hello"))
        toolbar.addWidget(QCheckBox())

        self.setStatusBar(QStatusBar(self))

        menu = self.menuBar()

        file_menu = menu.addMenu("&File")
        file_menu.addAction(button_action)
        file_menu.addSeparator()

        file_submenu = file_menu.addMenu("Submenu")
        file_submenu.addAction(button_action2)

    def onMyToolBarButtonClick(self, s):
        print("click", s)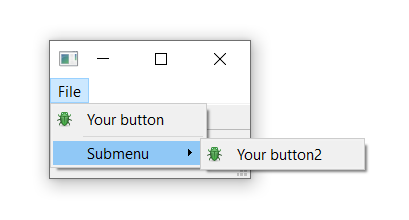
마지막으로 키보드 QAction 단축키를 전달하고 setKeySequence() 키 시퀀스를 전달하여 키보드 단축키를 정의한다. 정의된 키 시퀀스가 메뉴에 나타난다.
키 시퀀스는 텍스트로 전달하거나, Qt 네임스페이스의 키 이름을 사용하거나, Qt 네임스페이스에서 정의된 키 시퀀스를 사용하여 여러 가지 방법으로 정의할 수 있다. 운영 체제 표준을 준수하도록 할 수 있는 곳이면 어디에서나 후자를 사용한다.
툴바 버튼과 메뉴를 보여주는 완성된 코드는 아래와 같다.
class MainWindow(QMainWindow):
    def __init__(self):
        super().__init__()

        self.setWindowTitle("My App")

        label = QLabel("Hello!")

        # The `Qt` namespace has a lot of attributes to customize
        # widgets. See: http://doc.qt.io/qt-5/qt.html
        label.setAlignment(Qt.AlignCenter)

        # Set the central widget of the Window. Widget will expand
        # to take up all the space in the window by default.
        self.setCentralWidget(label)

        toolbar = QToolBar("My main toolbar")
        toolbar.setIconSize(QSize(16, 16))
        self.addToolBar(toolbar)

        button_action = QAction(QIcon("bug.png"), "&Your button", self)
        button_action.setStatusTip("This is your button")
        button_action.triggered.connect(self.onMyToolBarButtonClick)
        button_action.setCheckable(True)
        # You can enter keyboard shortcuts using key names (e.g. Ctrl+p)
        # Qt.namespace identifiers (e.g. Qt.CTRL + Qt.Key_P)
        # or system agnostic identifiers (e.g. QKeySequence.Print)
        button_action.setShortcut(QKeySequence("Ctrl+p"))
        toolbar.addAction(button_action)

        toolbar.addSeparator()

        button_action2 = QAction(QIcon("bug.png"), "Your &button2", self)
        button_action2.setStatusTip("This is your button2")
        button_action2.triggered.connect(self.onMyToolBarButtonClick)
        button_action2.setCheckable(True)
        toolbar.addAction(button_action)

        toolbar.addWidget(QLabel("Hello"))
        toolbar.addWidget(QCheckBox())

        self.setStatusBar(QStatusBar(self))

        menu = self.menuBar()

        file_menu = menu.addMenu("&File")
        file_menu.addAction(button_action)

        file_menu.addSeparator()

        file_submenu = file_menu.addMenu("Submenu")

        file_submenu.addAction(button_action2)

    def onMyToolBarButtonClick(self, s):
print("click", s)'Python Library > PySide' 카테고리의 다른 글
| [PySide] 대화 상자 (Dialogs) (2) (0) | 2022.06.27 |
|---|---|
| [PySide] 대화 상자 (Dialogs) (1) (0) | 2022.06.27 |
| [PySide] 툴바 (Toolbars) (0) | 2022.06.27 |
| [PySide] 레이아웃 (Layouts) (3) (0) | 2022.06.23 |
| [PySide] 레이아웃 (Layouts) (2) (0) | 2022.06.23 |


