728x90
반응형
SMALL
데이터 로드
from keras.datasets import mnist
import numpy as np

(x_train, _), (x_test, _) = mnist.load_data()
x_train = x_train.astype('float32') / 255.
x_test = x_test.astype('float32') / 255.
x_train = np.reshape(x_train, (len(x_train), 28, 28, 1))
x_test = np.reshape(x_test, (len(x_test), 28, 28, 1))
모델 생성
from keras.layers import Input, Dense, Conv2D, MaxPooling2D, UpSampling2D
from keras.models import Model
from keras import backend as K

input_img = Input(shape=(28, 28, 1))
x = Conv2D(16, (3, 3), activation='relu', padding='same')(input_img)
x = MaxPooling2D((2, 2), padding='same')(x)
x = Conv2D(8, (3, 3), activation='relu', padding='same')(x)
x = MaxPooling2D((2, 2), padding='same')(x)
x = Conv2D(8, (3, 3), activation='relu', padding='same')(x)
encoded = MaxPooling2D((2, 2), padding='same')(x)
먼저, 입력층을 만들어 이미지를 입력으로 받아 차례대로 3개의 Conv2D 층을 통과시키면서 점점 고수준의 특성을 잡아낸다. Maxpooling2D 층을 통해 출력의 크기를 줄여가며 점점 압축한다.
x = Conv2D(8, (3, 3), activation='relu', padding='same')(encoded)
x = UpSampling2D((2, 2))(x)
x = Conv2D(8, (3, 3), activation='relu', padding='same')(x)
x = UpSampling2D((2, 2))(x)
x = Conv2D(16, (3, 3), activation='relu')(x)
x = UpSampling2D((2, 2))(x)
decoded = Conv2D(1, (3, 3), activation='sigmoid', padding='same')(x)
autoencoder = Model(input_img, decoded)
디코더는 인코더의 반대로 층을 구성하며 Upsampling2D 층을 이용하여 출력의 크기를 점점 키운다. 디코더는 항상 인코더의 완전한 반대 구조를 가질 필요는 없다. 디코더에 있는 마지막 층의 출력이 인코더의 입력과 크기만 같다면 어떠한 구조도 가능하다.
마지막으로는 인코더와 디코더 두 모델을 연결시킨 최종 모델을 정의한다. 이 모델은 이미지를 받아 인코더와 디코더를 통과시켜 원본 이미지의 재구성을 만든다.
모델 훈련
모델을 학습시키기 전, 손실 함수와 최적화 함수를 모델 학습에 연결해야 한다. 손실 함수는 원본 이미지와 재구성의 개별 픽셀에 대한 평균 제곱근 오차 (RMSE)나 이진 크로스 엔트로피 (binary cross-entropy)를 보통 사용한다. 손실 함수와 최적화 함수를 연결한 후, 기타 파라미터를 설정하여 Autoencoder를 훈련시킨다.
autoencoder.compile(optimizer='adadelta', loss='binary_crossentropy')
autoencoder.fit(x_train, x_train,
                epochs=50,
                batch_size=128,
                shuffle=True,
                validation_data=(x_test, x_test))
import matplotlib.pyplot as plt
n = 10
decoded_imgs = autoencoder.predict(x_test)
plt.figure(figsize=(20, 4))
for i in range(n):
ax = plt.subplot(2, n, i + 1)
plt.imshow(x_test[i].reshape(28, 28))
plt.gray()
ax.get_xaxis().set_visible(False)
ax.get_yaxis().set_visible(False)
ax = plt.subplot(2, n, i + 1 + n)
plt.imshow(decoded_imgs[i].reshape(28, 28))
plt.gray()
ax.get_xaxis().set_visible(False)
ax.get_yaxis().set_visible(False)
plt.show()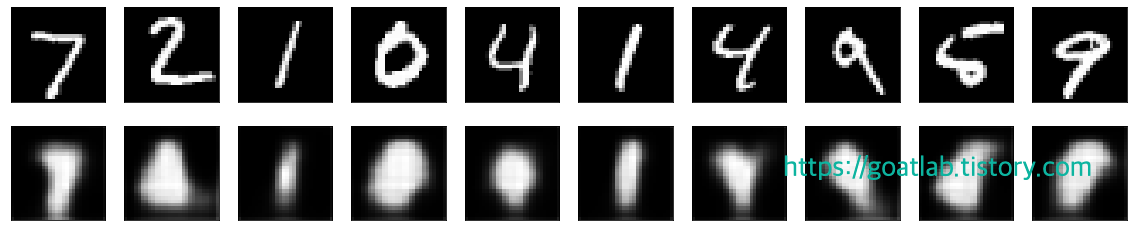
728x90
반응형
LIST
'Visual Intelligence > Generative Model' 카테고리의 다른 글
| [Generative Model] VAE (MNIST) (0) | 2022.12.08 |
|---|---|
| [Generative Model] VAE (Variational AutoEncoder) (0) | 2022.12.08 |
| [Generative Model] 오토인코더 (AutoEncoder) (0) | 2022.12.08 |
| 생성 모델 (Generative Model) (0) | 2022.12.08 |
| [Generative Model] 서로 다른 이미지 오토인코더 (0) | 2022.11.25 |


